
You’ve been staring at trail maps all week, but your current backpack leaves your shoulders aching after just five miles. You need a pack that can handle Washington’s relentless rain, steep switchbacks, and heavy bear canisters. The problem isn’t your fitness—it’s your gear. Choosing the right backpack is the single most important decision you’ll make before hitting the Cascades or the Olympic Peninsula. This guide breaks down exactly how to select the perfect pack for your body, your trip length, and the unique challenges of the Evergreen State.
In the sections below, you’ll learn how to calculate your pack volume based on trip duration, why a proper hip belt matters more than brand, and how to waterproof your gear against a Pacific Northwest downpour. You’ll also discover which frame types work best for off-trail bushwhacking and how to adjust your pack for a custom fit. By the end, you’ll know precisely what to look for—and what to avoid—when searching for the best camping backpack for men in Washington, whether you’re planning a 3-day trek or a week-long expedition.
Why Washington’s Terrain Demands a Specific Backpack Design
Washington is not Colorado or California. The combination of high humidity, relentless precipitation, and highly variable elevation creates a unique set of demands. A pack that works in the Sierra Nevada might fail miserably on the Hoh River Trail. The key differences come down to fabric durability, water resistance, and ventilation.
Most importantly, you need a pack that sheds water without adding excessive weight. Fabrics like Dyneema or coated ripstop nylon perform better than standard nylon. You also need a frame that handles awkward, heavy loads like a full 6-liter bear canister strapped horizontally.
Evaluating the “Big Three” Outdoor Regions
The Olympic Peninsula requires waterproofing; the North Cascades require load stability; the Columbia River Gorge requires ventilation. No single pack is perfect for all three, but a hybrid design with a ventilated back panel and a rain cover comes closest.
Why “Packability” Matters More Than Raw Capacity
A 70-liter pack isn’t automatically better than a 55-liter pack if you can’t compress your gear. Look for external compression straps that cinch down tight. This allows the pack to carry smaller loads like a 20-pound overnight kit without feeling floppy or unstable.
What Size Backpack Do You Actually Need for Washington Trips?
The common advice of “buy the biggest you can afford” is wrong. A pack that’s too large encourages overpacking, leading to back pain and excessive fatigue. For Washington, the sweet spot depends on your trip length and whether you carry a bear canister.
Here’s a quick rule of thumb: 40-50 liters for overnight trips, 55-70 liters for 3-5 day trips, and 70+ liters for trips over a week or winter climbs. But these numbers shift if you’re carrying a climbing rope or a DSLR camera.
Calculating Volume Based on Your Sleeping System
Your sleeping bag and tent compressibility dictate pack volume. If your sleeping bag stuffs down to 8 liters and your tent to 5 liters, you’ll have more room for food. Measure your gear’s packed volume before choosing a pack size.
Understanding the “Loaded Bear Canister” Rule
In the Olympic National Park, bear canisters are required. A standard 12-inch canister takes up significant space. If you plan to carry one vertically, you need 20 additional liters just for that. Horizontal carry requires extra width and a wider framestand.
Which Frame Type Handles Washington’s Passes Best?
Internal frames dominate the market, but external frames still have a niche for heavy loads. For Washington’s terrain, a modern internal frame with a rigid-ish perimeter stay is the most versatile. It transfers weight to your hips effectively while allowing freedom of movement.
If you plan to scramble peaks like Mailbox Peak or hike across steep snowfields, a frame with a pivoting hip belt (common on luxury packs) helps maintain natural gait. Rigid frames are better for flat, even trails but punish you on uneven rocks,Just as you need to avoid critical errors when choosing everyday gear—similar to the 10 Mistakes People Make When Buying a Commuter Bag—selecting an outdoor pack requires focusing heavily on structural support, sizing, and intended trail use rather than just initial aesthetics.
A Comparison of Internal vs. External vs. Frameless
| Frame Type | Best For | Weight Capacity | Washington Suitability |
|---|---|---|---|
| Internal | All-round use | 30–60 lbs | Best overall choice |
| External | Hunting, heavy loads over 60 lbs | 60–100 lbs | Poor for steep, rocky trails |
| Frameless | Ultralight trips | 15–25 lbs | Risky for rainy climates (less structure) |
Why You Should Avoid an Ultra-Flexible Frame
Packs with highly flexible frames (often marketed as “sleeping bag compression-style”) sag under 35+ lbs. This causes the load to pull away from your back, increasing fatigue. Test the pack with weight at the store.
How to Achieve a Perfect Hip Belt Fit for Your Body Type
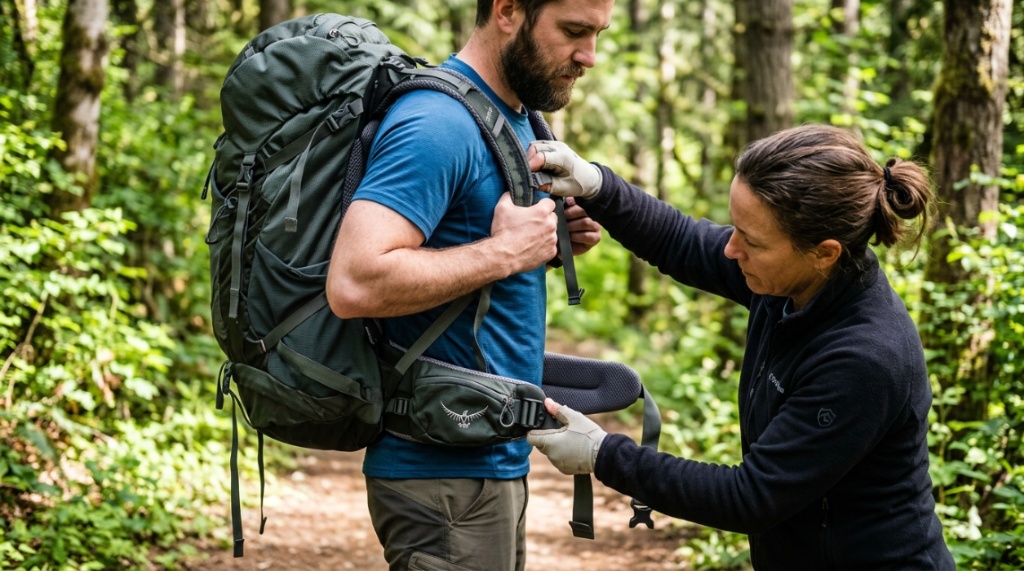
80% of the pack’s weight should rest on your hips, not your shoulders. To get that right, the hip belt’s top edge must sit exactly on your iliac crest (the top of your hip bones). This requires knowing your torso length, not your height.
Measure from the C7 vertebra (the bony bump at the base of your neck) down to your iliac crest. This torso length determines your pack size (e.g., medium = 18-20 inches, large = 20-22 inches). Most packs fail because men buy a large when they need a medium.
A Step-by-Step Guide to Adjusting Your Load Lifter Straps
Once the hip belt is snug, the shoulder straps should wrap over your shoulders without gaps. Then, tighten the load lifter straps (located at the top of the shoulder straps). These should angle at roughly 45 degrees to pull the pack toward your shoulders and rotate the pack’s weight onto your hips.
Why You Must Try a Pack with a Loaded 25 lbs
An empty pack fits differently. Before buying, fill it with 25 lbs of soft gear and walk around the store for 15 minutes. Check for pressure points on your collarbone and any feeling of the pack wobbling. If it doesn’t feel stable, try a different size.
Can You Waterproof a Backpack Against Washington Rain?
No pack is truly 100% waterproof. Even with a coated fabric, water seeps through seams and zippers. The solution is a three-pronged approach: use a pack cover, a waterproof liner (like a 55-gallon trash bag or pack liner), and dry bags for critical gear.
Many men skip the liner because they think the rain cover is enough. That’s a mistake. Rain covers block the outside, but condensation from your sweaty back can wet items inside. A liner solves both.
Which Fabric Coatings Resist the Damp the Best?
Look for PU or silicone-coated nylon with a hydrostatic head rating of 3,000mm or higher. However, repeated folding degrades the coating. A better solution is a pack made from Dyneema Composite Fabric (DCF), which is naturally waterproof but expensive.
Hydrophobic Zippers vs. Rain Covers
Hypalon or water-resistant zippers (like Tizip) offer an excellent seal but are mostly found on high-end expedition packs. For most day-to-day trips, a high-quality polyurethane-coated cover is sufficient, but you must buy a cover that fits a loaded pack (usually large or extra large).
When Is the Best Time of Year to Buy a Backpack in WA?
If you’re looking for discounts, buy in September or October when retailers are clearing summer inventory. However, if you want the widest selection and expert advice, shop in March or April when new models arrive and staff are trained on features.
But the true “best time” depends on your first trip. Don’t wait until May to buy a pack for a June trip on the Wonderland Trail. Give yourself two weeks to break it in and adjust straps.
Considering “Shoulder Season” Bargains
From November to February, REI and local shops like Feathered Friends often have clearance sales. You can save 20-30% on last year’s models. Just check the gear carefully for any factory defects or missing rain covers.
How to Use Rental Programs to Test Before Buying
Many Washington outfitters, like REI in Seattle, rent packs for around $30 for 48 hours. Use this to test a pack on a real trail. Try the same pack you’re considering on a 10-mile hike with 25 lbs. You’ll learn more than in a store.
Which Features Do You Truly Need vs. What’s Just Gimmick?
Features like built-in sunscreen, bladders with magnetic hose clips, and duffel-style main compartments sound useful but often add weight and cost. The essential features for Washington are: a hip belt with a smooth zipper pocket (for a phone), dual side water bottle pockets (for quick access), and a bottom sleeping bag compartment.
Skip the heavy leather or metal details. They look nice but add bulk. Look instead for a pack with a floating top lid that can be removed to save weight on a day trip.
The Case for a Fully Detachable Daypack
Many packs have a “sleeve” to turn the main pack into a daypack while leaving a summit pack on the framestand. For Washington’s alpine climbs, this is valuable—you can leave the 60L in the base camp and hike with a 15L sub-pack. However, extra zippers and clips are failure points.
Ventilated Back Panels: Is Airflow Worth It?
Yes. On a hot 70°F day on the Painted Hills in Eastern Washington, you’ll sweat less with a trampoline-style back panel (like Osprey’s Anti-Gravity). However, these panels make the pack heavier and tilt your load backwards. Test this by loading the pack and checking if you feel like you’re leaning forward to compensate.
How to Pack a Backpack for Rainy Trail Conditions
Packing technique can be as important as the pack itself. Start by placing a waterproof liner (or a heavy-duty trash bag) at the bottom of the pack, then place your sleeping bag inside. Then place heavier items like the tent and stove vertically against your back, near your spine. This centers the load.
But for Washington’s rainy trails, you also need to anticipate frequent stops. Put your rain jacket, headlamp, and a high-energy snack in the top lid pocket or hip belt. This avoids needing to unpack the main compartment in the rain.
Where to Place a Wet Tent When Dismantling in the Rain
Use a separate, waterproof “wet gear” storage area. Many packs have a designated side or bottom pocket for this. If yours doesn’t, attach a waterproof dry sack to the outside with carabiners. Never put a wet tent loose inside your pack—it will soak everything.
Strategies for Managing a Bear Canister on the Go
You can place the canister vertically in the main compartment. To keep the pack stable, pack soft items like clothes around the canister’s bottom and sides. If you strap it on top, expect an unstable, top-heavy load on rough terrain. Test both methods before a long trail.
Top 3 Mistakes Men Make When Choosing a Pack in Washington
The first mistake is buying a pack without doing the torso measurement, leading to a painful case of shoulder bruising. The second is assuming “bigger is better.” The third is ignoring the weight of the pack itself—a 5 lb pack means less weight for food or gear.
These mistakes ruin trips. A pack that’s too heavy means you leave behind your water filter or a warmer jacket. A pack that’s too big tempts you to overpack. Here’s how to avoid them.
Ignoring the Base Weight of the Backpack
Some packs like the Berghaus Proton 70 weigh nearly 6 lbs. Others like the Hyperlite 3400 weigh 2 lbs. For a weekend trip on the Enchanted Valley, saving 3 lbs is significant. But you also need durability—ultralight fabrics can tear on granite.
Overestimating the Need for a 75L Pack
Unless you are carrying a full climbing rack, a sled, or food for 10 days, a 75L is overkill. You’ll be carrying extra space that encourages wanton packing. Instead, buy a 55-65L pack and use external attachment straps for a tent or sleeping pad.
Is a Custom-Fit Backpack Worth the High Cost?
Custom backpacks (like those from McHale Packs) cost $800-$1500. They are worth it if you have extreme torso lengths (under 16″ or over 22″) or specific back injuries. However, most men can get a perfect fit from an off-the-shelf pack with good adjustability.
What’s more important is learning to adjust your pack with your specific load. A $700 pack that’s adjusted poorly performs worse than a $300 pack adjusted perfectly. Invest time in learning, not just money.
Finding a Professional Fitter at a Local Shop
Stores like Ascent Outdoors in Ballard or Basecamp in Issaquah offer fitting sessions. They’ll measure your torso, check your back curvature, and load the pack with weights. This service is often free if you buy a pack there, but they may charge $50 if you walk out. It’s worth it.
Adjustability Features to Look For
Check if the shoulder straps can be moved up and down via velcro or a ladder system. Also check if the torso length is adjustable. Some packs, like the Deuter Scaler, let you adjust within a 3-inch range. This extends the pack’s lifespan as your body or gear changes.
Frequently Asked Questions
Are expensive backpacks worth it for occasional camping?
Not necessarily. If you camp 2-3 times a year, a mid-range pack from REI (like the Trailblazer) is a wise investment. Expensive packs offer lighter materials and better warranties, but they only pay off with high-frequency use.
What is the typical lifespan of a backpack?
With proper care, a pack can last 10-15 years. Check the seams and coating for wear. Most failures come from zippers breaking, not fabric tearing. Wash your pack gently and store it dry and uncompressed.
Can I use a hunting pack for regular camping?
Yes, but most hunting packs are heavier and have stiffer frames. They also have multiple exterior pockets, which can cause snagging on tight trails. They are great if you need to carry quartered meat but overkill for recreational hiking.
What is the best pack capacity for a 3-day trip in the Olympics?
For a 3-day trip carrying a bear canister, we recommend a 55-65 liter pack. This gives you room for a 20lb canister, a 3-season tent, and 4 days of food. If you can’t fit it all, you’re overpacking clothing.
How do I clean my backpack after a muddy trail?
Use a soft brush and cool, soapy water. Scrub the straps carefully. Rinse thoroughly and hang dry in the shade. Do not machine wash or dry. Reapply a waterproofing spray like Nikwax TX.Direct to the fabric and DWR coating.
Conclusion: Your Next Step to Comfortable Hikes
Choosing the best camping backpack for men in Washington isn’t about the most expensive or the largest pack. It requires measuring your torso, understanding your trip’s volume requirements, and prioritizing a snug hip belt. We’ve walked you through waterproofing, frame types, and packing strategies. Now it’s time to visit an outfitter. Load a pack with 25 lbs, walk around the block, and notice how it feels. Your shoulders and back will thank you on the third day of rain-soaked switchbacks, when you’re still smiling because your pack fits perfectly.
Take the next step: visit a local Seattle or outdoor store, get measured, and invest in a quality pack from a brand you trust. Don’t leave it to chance—your comfort and safety depend on it.